Home & DIY
Here’s How to Transform an Old Table into Amazing Glow-in-the-Dark Table
Daniel Wilson DIY enthusiast, woodworker, and leather crafter extraordinaire received an old table as a donation. It was a tad used, and not really his style, but that didn’t stop him from transforming it into a glowing work of art. He decided to revive the table by turning it into a glow-in-the-dark table with a map of the world.
Here’s how he did it.
He started off the project by getting a simple map off the net, and printing it in 6 A4-sized segments.

Source: Daniel Wilson
He glued the map to the wood surface of the table…

Source: Daniel Wilson
And tracing the outline of the countries and carving it out. Daniel apologizes if he ruined the outline of your country. But hey, we think he did a pretty good job!

Source: Daniel Wilson
He then used a sander to remove the "seas" so as to leave the countries embossed. It's a pretty time-consuming project, so we guess he did the sanding over the course of a couple of days.

Source: Daniel Wilson
It's particularly tough to sand around smaller countries like Australasia.

Source: Daniel Wilson
But eventually, Daniel was able to sand the edges of the entire map.

Source: Daniel Wilson
Now on to the legs. Daniel didn't like to original legs, so he replaced them with something more modern.

Source: Daniel Wilson
He then painted a blue basecoat for the sea to give the epoxy resin some color.

Source: Daniel Wilson
Next comes the glowy part! Daniel got his hands on some glow-in-the-dark powder from Amazon and mixed it in with the epoxy resin before pouring it into the table.

Source: Daniel Wilson
In a fit of panic he also added in as much blue food coloring he could find in an attempt to hide the imperfections.

Source: Daniel Wilson
Once it dried up, the color went cloudy in some places, which had a really nice effect.

Source: Daniel Wilson
And then he started to sand.

Source: Daniel Wilson
And varnish… And varnish some more. It took him 5 coats of varnish.

Source: Daniel Wilson
He also added a mechanism to allow the table to be brought up and forward over the knees.

Source: Daniel Wilson
And he's done!
Source: Daniel Wilson
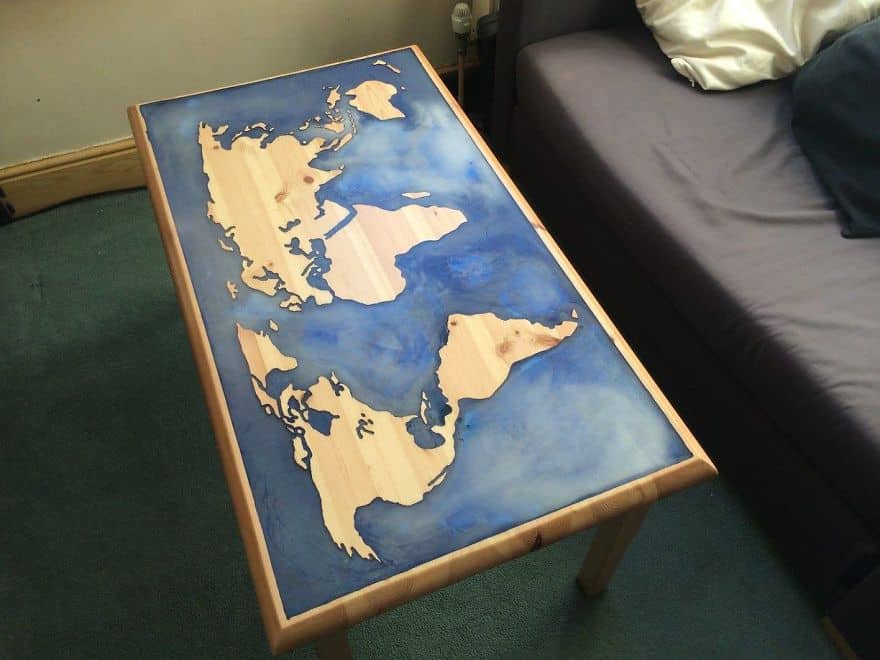
Here's what his glow-in-the-dark table looks like.

Source: Daniel Wilson
Here's what the glow-in-the-dark table looks like with the lights off.

Source: Daniel Wilson

Source: Daniel Wilson
And voila! From an old table to a functional work of art!


Travel7 months ago
Cabo After Hours: Salt Air, Tequila Smoke and How to do Nothing Beautifully

History3 years ago
March 14th Holiday – Pi Day or Something Else?

Others3 years ago
Mystery Of Missing Pages
Others3 years ago
Dafabet 88

Stories5 years ago
Bees Kill Penguins by Stinging Them in the Eyes

OMG5 years ago
2000 Kilogram Sunfish Caught Off North African Coast
Others5 years ago
Strong Junior Middle Full Stack Delevoper at UncleSolutions

Funny5 years ago
Man Embezzles $57K in COVID-19 Relief to Buy Pokemon Cards

OMG5 years ago
Florida Man Catches and “Recycles” Alligator in Driveway

Funny5 years ago
Man Shocks Reporter on How He’d Spend the Lottery Winnings
Travel7 months ago
Cabo After Hours: Salt Air, Tequila Smoke and How to do Nothing Beautifully
History3 years ago
March 14th Holiday – Pi Day or Something Else?
Others3 years ago
Mystery Of Missing Pages
Others3 years ago
Dafabet 88
Stories5 years ago
Bees Kill Penguins by Stinging Them in the Eyes
OMG5 years ago
2000 Kilogram Sunfish Caught Off North African Coast
Others5 years ago
Strong Junior Middle Full Stack Delevoper at UncleSolutions
Funny5 years ago
Man Embezzles $57K in COVID-19 Relief to Buy Pokemon Cards
OMG5 years ago
Florida Man Catches and “Recycles” Alligator in Driveway
Funny5 years ago